 Using your photo printer to the fullest does not require expensive equipment. This is a step-by-step guide for those who want to calibrate his photo printer at home.
Ink + paper = something unexpected
You should know that ink is either a solution of coloring agents or a water suspense of solid color particles. And paper is some porous surface with certain roughness, own whiteness, thickness and reflecting power.
So when ink meets paper, rarely something good comes out of it (especially when they are made by different brands) under default printing settings: the results of this interaction are often hard to predict. Bu there’s something you can do about it.
Ink + paper + color profile = something good
There are color profiles to make up for the difference in color rendering. Basically, they are charts for correction of color reproduction. Color profiles contain information on how to adjust colors to provide the required quality of print on this printer using this paper and these inks.
So it’s best to calibrate your printer for every new paper and inks you use. Professional printers are very much aware of this. For instance, to publish a number of copies of an artwork book, they used to (and still do) spend most of the time not actually printing it, but looking for a perfect match of color with given paper.
Hardware and software for calibrating
A modern flatbed scanner is an advanced tool for reading color information, so it makes sense to use scanners for color calibrating. The device reads the information about color in aim points of test image. After that, the information can be used to create a color profile.
You’ll also need a piece of software for building a color profile, and there are a number of such programs. I got handy only one, the ProfilerPro.
ProfilerPro is not standalone software, but a plug-in for the Adobe Photoshop. I personally salute this for I like when graphic creations of various makers can be used with good old Photoshop. So, you can use the ProfilerPro to build color profiles for printers. Naturally, for a variety of inks and paper.
Here I will describe in details how to build a color profile for RGB working space.
Install the plug-in
In the Photoshop color settings change the working color space to RGB.
After plug-in installation, two new entries will appear in the menu — DoctorPro and ProfilerPro.
The ProfilerPro is what we need to run.
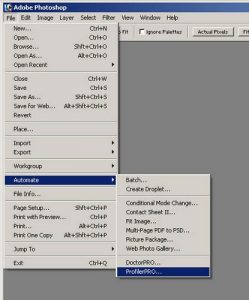
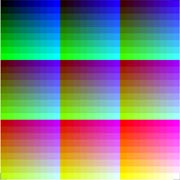
Choose the first item — Load Calibration Chart.
It looks nice. So far.
Get the full size version of calibration chart sample.
Print the calibration chart
In Print Preview select Print Space profile “same as source”.
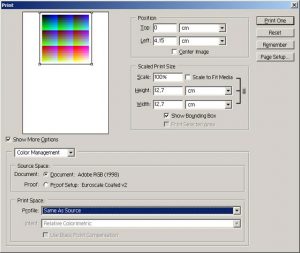
In Printing Preferences disable color correction. Now our chart will be printed without any enhancements made by the software.
After the chart is printed, let the colors settle. In other words, inks must dry up. When done, we put the printed chart into scanner.
In scanning setting, make sure any color correction is off.
After scanning we have this:
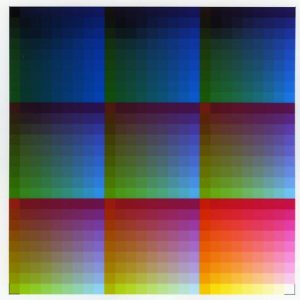
As you can see, the chart is printed with distortions. Color gradients are not smooth, darker sectors of the chart are lighter than adjacent light sectors. Save the results as *.tif file.
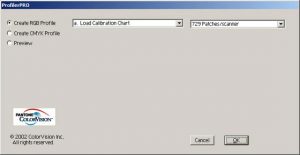
Build a profile
To build a profile, run ProfilerPro and select menu item D — Build Profile from Chart Scan.
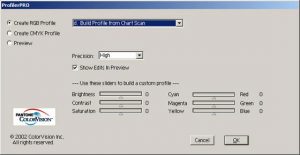
The program will prompt you to save the profile. Save it under a name of your choice (and remember it) and restart the Photoshop, so that it “sees” the profile.
First thing we should to do is quality check the profile.
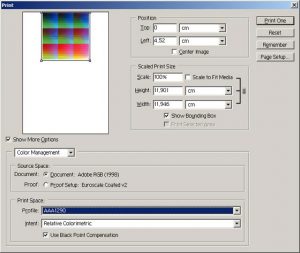
To do so, print out the calibrating chart using the profile.
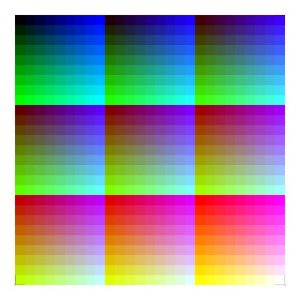
Like this:
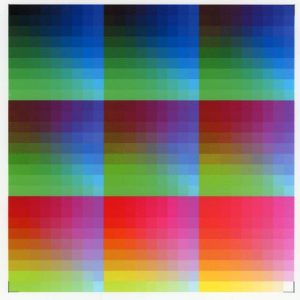
Get results
Eventually, you’ll get a chart looking like that, which is more close to original. I’m completely happy with the color reproduction I got using created profile.
A logical question may arise: do you need to precalibrate the scanner before using it as measuring tool?
When experimenting with calibration, I used two different scanners, Epson Perfection 4990 and Epson Perfection 1650. The results I got on these scanners are virtually identical. The two scanners were used without any color correction or color profiles.
I can’t say once and for all “no, you don’t need to calibrate the scanner”. Actually, you might need to. I guess it’s going to be another whole story. But for now I can only repeat that using two different scanners I got great color profile that I’m completely satisfied with.
How about you?